Over the last several weeks we've been sharing all of the various aspects of our master bedroom renovation work. Though the project took quite a bit of time from start to finish, it's one of the projects in our house that has truly transformed the cold and uninviting space into one that's warm and welcoming. From the added space of custom closets, to the calming and serene wall color, ceiling color, and fabric choices, it's a place that Alex and I look forward to laying our head each night, and waking up each morning.
As we mentioned in past posts, the addition of our closets to the previously underutilized chimney wall solved a significant storage problem in our room. Now our clothes, my shoes, and even our extra storage tubs have a place to stay neat and organized. However, there's one very critical storage item that wasn't solved with the closet build -- my collection of necklaces, earrings, bracelets, and other miscellaneous bobbles I've picked up at thrift stores, antique stores, Ann Taylor Loft (there's one on the way home from work, I'm powerless to resist), and various other places. Yep, things just got real, I'm talking about?jewelry?storage.?
At this point you've seen all of the various after photos of our bedroom, as well as the interior shots of our closet, but have you been able to pick out my?jewelry?storage from these photos? It's been hiding in plain sight all along. Here's a refresher. See if you can spot it.
Can you see it yet? No? Any guesses? Take a closer look.
Okay, here you go, I'll let you in on my little secret.
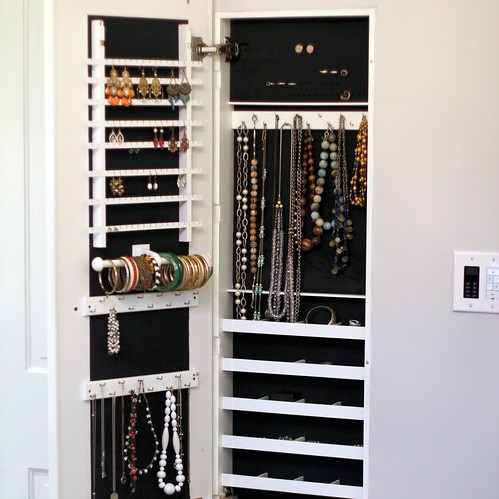
Yep, that's right folks, the mirror between the bedroom and bathroom door is actually concealing all of my costume jewelry. This little hidden cabinet creation came to me a while back when I realized my previous jewelry storage solution was particularly lacking in both form and function. My previous setup primarily consisted of shoving all of my stuff into a few wooden and cardboard jewelry boxes that I then shoved under my socks and underwear in my dresser drawers. Given my Type A need to organize and understand exactly what I have when planning my outfits, this configuration left something to be desired.
At one point I proposed a solution to Alex that was a challenge of sorts. I think I said something along the lines of "can you build me a jewelry cabinet?" I'm pretty sure his willing husband response was, "Yeah, sure I can." (Don't you love his optimism?) I followed that up with the next logical question of "how long do you think it will take?" Though his voice said, "Meh, a few days," his verbal response didn't matter, I could see it in his eyes, it was not days or weeks, but probably months at least. I appreciate my husband for all of his creativity, DIY skills, and drive, but his ability to properly estimate a project's timeline is, how do I put this gently and accurately...severely lacking.
In my quest to both achieve my desire for?organized?jewelry storage and my need to accomplish the task while I'm still young enough to wear said jewelry, I began researching other options. During my nights of Internet sleuthing I stumbled across a somewhat ideal solution from a organizational perspective, named the "Safekeeper Mirrored Jewelry Cabinet."
This cabinet seemed just about perfect. It has storage for earrings, bracelets, necklaces, glasses, and even pockets and cubbies for miscellaneous items. The various compartments satisfied all of my storage desires while allowing a tremendous amount of room for future growth. What more could a girl want? The only problem with this cabinet is I didn't want my jewelry cabinet sitting out in the middle of our room. So I took my photos to Alex and presented my next challenge, "Can you use this as a basis for the storage but somehow integrate it into our room?" After a bit of arguing that he could build the same thing for so much less money and at a higher quality, he eventually agreed, it was an excellent starting point for our needs and he could use the cabinet as a built in item, but make it unique to our room. Okay, problem solved and challenge accepted.
The place that I first saw this cabinet had it for sale for about $300. This was extremely steep given that we weren't planning to use the whole thing and that it isn't made of solid cherry or mahogany. Alex and I started searching for deals and eventually found one on eBay for just $110 including shipping. When it arrived we got to work.?
Since our room's walls are plaster on brick on two of four walls, and the third wall is a party wall between our house and our neighbor's, we really only had one place where we could locate the cabinet as an in-wall unit, and that was largely taken by the two doors to the room. Given our limitations, we found a good location that satisfied our needs and allowed us to conceal the whole unit. We cut a hole in the wall and had an amazing stroke of luck. The stud Alex expected to be in the way and we'd need to work around was mysteriously missing. It seems the walls had been altered at some point in the past and there simply wasn't a stud behind the plaster/drywall that occupied the area.
We put a support stud in place on both the side and bottom of the cabinet and popped the bad boy into the wall with two nails through either side of the cabinet.?
We had removed the mirror from the front and weren't sure if we were going to use it on the final install. Since this cabinet was going to live inset into the wall, we really needed something that offered a bit more overlay around the?perimeter?of the cabinet, but what that thing was exactly, I wasn't sure.
It wasn't until we were out at Luckett's Antique Store on one fateful day when I saw my mirror waiting for us. We had long debated if we should use a traditional dressing mirror or something more visually interesting. We had hoped to find something with dimensions that would conceal the entire cabinet, but also knew our specific dimensions made this very difficult. When we found this mirror its dimensions were nearly perfect, just a little short and narrow, its style was something that I loved, and one of the mirrors had a small and barely noticeable crack, which meant it was significantly marked down, score! We snapped it up and brought it home that day.
The mirror itself is actually three dimensional. Each four triangle section makes a pyramid that protrudes from the base several inches. The frame of the mirror is steel and is painted in a manner to make it looks weathered.
A short while after we brought it home Alex began work on the custom panel and frame for my angular and interesting decorative mirror find. He determined the ideal dimensions for the door and necessary overlay based on the side of the mirror, the size of the opening, and the location between the two doors. He also had to?accommodate?the light switch to the right of the location. It wasn't an easy calculation, so I'm very glad he and his anal retentive math skills were on the job.
Alex built the base of the mirror/door from 1/2" plywood and used a few wood screws to hang the mirror using the hanger holes on the rear of the mirror. The plywood allowed us to mount the mirror in a manner that would cover the entire cabinet and properly position the door in the area between the two passage doors. The end result looks completely integrated, but we can remove the mirror from frame at any time simply by loosening screws and sliding it out.
He then used a combination of two moldings to wrap the plywood, as well as a few pieces of 1/4" trim to form a border on the rear of the door. This effectively disguised the plywood and made a true frame for the mirror.
This also allowed me to carefully pry the black fabric panel from the rear of the cabinet's original mirror and affix it to the back of the newly built door. Alex finished off the whole install with a pair of European cabinet hinges that helps the door extend away from the wall as it opens. Without these hinges, the overlay of the left side of the door would gouge the wall.
He inset one side of the hinges into the door panel using a standard European hing drill bit, and then attached the business end of the hinge as a surface mount to the interior of the cabinet. We had to clear away a little bit of foam padding on the ring section to make it work, but it's a minor sacrifice to make this functional.
The end result is the?jewelry?cabinet of my dreams (to complement the closet of my dreams) neatly concealed behind a visually interesting piece of wall art. When I show off this little feature to people who visit our house they're usually shocked, excited, and a little bit jealous, all understandable.
It still brings a smile to my face every morning when I open the cabinet to pick out the bracelet or necklace I plan to wear for the day, and every evening when I hang my earrings or when Alex puts his cufflinks away after a fancy night out. ?
What do you think of our cabinet? Did you ever think there was anything more to the mirror on the wall than just an interesting mirror on the wall? Do you have a creative jewelry cabinet or storage solution that you're particularly fond of? I'd love to hear about any cool thing's you've done. Perhaps we could incorporate it in a future project.
jerusalem artichoke bud shootout aretha franklin stevie wonder new orleans weather new orleans weather sparkle
No comments:
Post a Comment
Note: Only a member of this blog may post a comment.